Understanding Focus Magnifier on Your Sony a6000 October 10, 2016 – Posted in: Photography – Tags: david busch a6000, david busch sony a6000 guide, Focus Magnifier, Focus Magnifier a6000, Manual Focus Assist, Manual Focus Assist a6000, peaking level, peaking level a6000, sony a6000
Rocky Nook’s camera guru and #1 best-selling camera manual author, David Busch provides a play-by-play to the Sony a6000’s Focus Magnifier feature! To learn more about this camera, be sure to check out his book, David Busch’s Sony a6000 Guide to Digital Photography.
Understanding Focus Magnifier. If you like to focus manually, this is a very useful aid, one of several that Sony generously offers to enhance the chore of achieving sharp focus without using autofocus features. (The others include Manual Focus Assist and Peaking Level.) Unfortunately, Sony has made implementation of this feature even more clumsy than the Zoom setting, and it can involve visiting as many as four different menu entries scattered among the Camera Settings and Custom Settings menu tabs. I’m going to show you how to simplify the process of using this feature, which is available only when you have the a6000 set for manual focus.
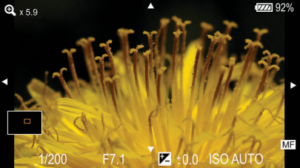
First, know that the focus magnifier is a feature that enlarges the LCD image so you can focus more easily on an enlarged portion of the image to view the subject you are trying to bring into focus more easily. Activate the magnifier, and the screen image will look something like Figure 1. The image is enlarged, and a navigation window appears at lower left showing an orange rectangle that represents the current location of the magnified portion of the frame. The center button magnifies the image up to 11.7X.
That part is easy. The complication comes from the need, by default, to make the trip to menuland to access this feature, and the three additional menu entries needed to configure it. If you’ll follow the steps that I outline next, your focus magnifier usage will be greatly simplified. But first, you should know the difference between the three manual focus aids that the a6000 includes:
Focus Magnifier. Focus Magnifier. As I said, this feature blows up the LCD image so you can view the subject you are trying to bring into focus more easily. Activate the magnifier using this menu entry or a button you define, and the screen image will look something like Figure 3.16. The image is enlarged, and a navigation window appears at lower left showing an orange rectangle that represents the current location of the blown-up section. A quartet of triangles surrounds the image, indicating that you can move the enlarged window around the frame with the left/right/up/ down keys. Pressing the center button enlarges the image from 1X to 5.9X and 11.7X. Rotate the lens’s focus ring to achieve sharp focus. Focus magnifier works only when using manual focus. The advantage/disadvantage of this tool is that you can/must activate it when you want to use it, or set a time limit for its display (described next). If you’d prefer to zoom in only when you specifically want to, use the focus magnifier rather than manual focus assist.
Manual Focus Assist. This feature, discussed later in this chapter, automatically provides a magnification of 5.9X (or 11.7X) if you press the center button when you rotate the lens focus ring while in Manual Focus or Direct Manual Focus mode. In that sense, it is easier to use because no special menu or button is needed to activate it and it works with both manual focus modes. However, if you only want to use magnification sometimes, you’re better off with the focus magnifier. Visit the Custom Settings 1 menu, change MF Assist to On, and you’re all set.
Peaking Level. This option also operates in Manual focus or Direct Manual Focus modes. As I’ll describe later, peaking outlines out of focus areas with your choice of red, yellow, or white highlighting. If you zoom in using the focus magnifier or manual focus assist, the colored highlighting is retained. This option is especially useful when attempting to manually focus in dark or dim conditions.
To use the focus magnifier, you can visit a few different menu tabs to configure it before putting it to work for the first time:
1. Activate Manual Focus. In the Camera Settings 3 menu, select Focus Mode and choose Manual Focus. You must do this every time you want to use the focus magnifier, if you are not already using Manual Focus. The magnifier does not work in other focus modes. It is completely disabled when you’ve selected AF-S, AF-C, or DMF.
2. Select activation time. When you summon the focus magnifier, it will zoom in on your image for the amount of time you specify, then automatically return to full screen view when you’re done manually focusing. You can select 2 seconds, 5 seconds, or No Limit. If you select No Limit, the image remains zoomed until you take a picture or press the shutter release halfway. Visit the Custom Settings 1 menu and select the Focus Magnif. Time entry.
3. Choose an activation button. The annoying thing about this feature is the need to visit the Camera Settings 4 menu each time you want to activate it. It’s easy to fix that by assigning focus magnifier to a custom key. Visit the Custom Settings 4 menu, select Custom Key Settings, highlight the Custom Button 2 entry (or Custom Button 1, if you prefer), and choose Focus Magnifier as its definition.
You can assign the focus magnifier to a different button instead, but the Custom 2 button at lower right on the back panel makes the most sense. Once you’ve learned the functions of your camera, you won’t need the default In Camera Guide function in shooting mode, anyway. And, even if you’ve redefined the button to summon the focus magnifier, it still functions as a Trash button in playback mode, so you’ve lost virtually nothing.
4. Turn on MF Assist and/or Peaking Level (located in the Custom Settings 2 menu). Set either or both of these if you’d like to use them along with the focus magnifier.
5. Use the focus magnifier. Once you’ve switched to manual focus, set activation time, and defined a button, just press your defined button. There’s no need to visit the menu. You’ll still need to press the center button to zoom in. (Sony should change the camera so that the defined Focus Magnifier button also zooms.) The focus magnifier is released after the specified activation time has elapsed, or when the shutter button is pressed halfway, and after you’ve taken a shot.
This article was taken from David Busch’s Sony a6000 Guide to Digital Photography—available now!