A growing love of good food and the desire to cultivate an online community of like-minded people has seen an explosion in the number of food blogs in recent years, but it still takes good photos to give a food blog visual appeal and get people’s juices flowing. Great food photos are relatively easy to shoot in daylight, but if you have a day job you might prefer to shoot in the evening. If you try to capture appetizing food photos in your kitchen’s artificial light, you are sure to be disappointed with the results.
Once again, flash comes to the rescue, even if capturing images of food means you have to work fast. Let’s face it, you want to cook while you shoot and then feast on the results, too! Here are some quick food photography tips for bloggers!
Equipment and Lighting
The need for speed makes using cumbersome tripods and light modifiers impossible, so bounce flash is the answer. Prepare your camera, TTL flash, and flag before you start cooking to maximize your chances of capturing a great image on the fly.
For this shot, I used an EOS 5D Mark II with an EF 24–105mm f/4 lens, but a crop-format camera with a kit lens would work just as well. I used a Canon Speedlite 580EX II fitted with my current version of Niel van Niekerk’s ”black foamie thing” (BFT).
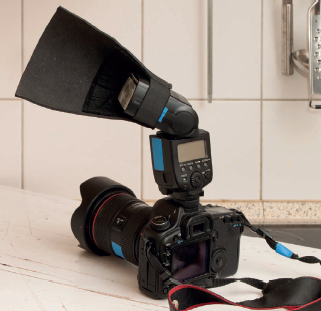
The camera, TTL flash, and ”black foamie thing” (BFT).
Settings and Shooting
An initial shot captured under the ambient room lighting serves as the “before” shot. In this case, neither the direction, the diffusion, nor the color temperature of the light was right, so the best solution was to cut it out altogether.
An example of a bad food shot to spur you on to greater things! This shot was captured in Auto mode under ambient room light.
To suppress the room lighting, I set the shutter speed to my camera’s sync speed and opened the aperture as wide as possible to ensure that the background in these close-up shots turned out nice and blurred. For this 24–105mm lens, f/4 is the widest aperture available. I set the ISO to 400 to keep the ambient light out of the picture and the required flash output to a minimum. Once everything was set up, I made a test shot without flash to make sure the ambient light was kept in check.

Once you have set your parameters in M mode, take a test shot without flash to confirm that the unfavorable room lighting has been suppressed. This shot shows that the settings were fine.
I then switched my flash to TTL mode and swiveled the head to the side. The BFT flag ensured that only soft, lateral light from the flash reached the subject. I tried bouncing the flash to the left and to the right, ultimately preferring the results from the right.

Now we add TTL flash, swiveled to the right and fitted with a BFT. Canon EOS 5D Mark II ∙ EF 24–105mm f/4 @ 32 mm and f/4 ∙ M mode ∙ 1/200 second ∙ ISO 400 ∙ JPEG ∙ WB set to flash ∙ On-camera Canon Speedlite 580EX II in TTL mode, fitted with a BFT
On food shoots, I often switch the white balance setting from flash to cloudy to produce a sunnier effect. Take care if you try this out for yourself, as the effect quickly looks overdone. If you shoot RAW, you can experiment more at the post-processing stage and adjust your white balance setting as necessary.
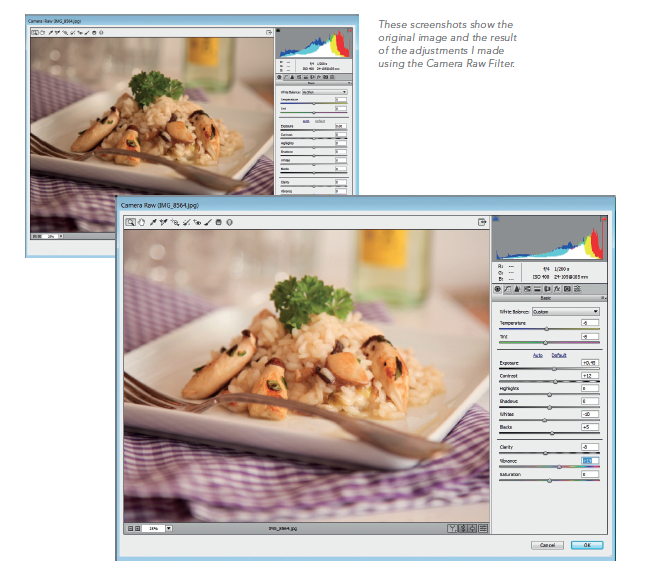
These screenshots show the original image and the result of the adjustments I made using Camera Raw Filter.
Post-Processing in Adobe Camera Raw and Photoshop
To keep things simple, I developed the images shown here from the JPEG versions of the shots. JPEGs, too, can be adjusted using the tools built into Adobe Camera Raw using Photoshop CC’s Camera Raw Filter tool. If you are using an older version of Photoshop, then use File > Open As… and select Camera Raw as the input. The size and dynamic range of the files and the range of available development options stay the same—in other words, JPEGs don’t magically become RAW files!—but you can at least use the sliders you are used to.
In this example, I slightly adjusted the Exposure and increased the Vibrance setting. The screenshots show the original image, the settings I used, and the result.
Tips and Tricks
If you follow the steps described here, your photos should turn out perfectly right off the bat.
If, however, your results are too dark or too bright, there are two ways to get things sorted out. For example, in the image shown here, if the rice appears too dark, set a flash exposure compensation (FEC) value between +0.3 and +1.0. If it’s too bright, take the opposite approach.
If TTL metering doesn’t work—either because the subject is too far from the center or doesn’t fill enough of the frame—try using spot flash metering and locking in the result. Canon’s version of this feature is called Flash Exposure Lock (FEL), while Nikon calls it Flash Value Lock (FV Lock).

Same, but different! The flash, camera, and lens were identical for both shots, but the results are quite different. Switching from direct flash to indirect bounced flash definitely pays off.
This except was taken from One Flash! Great Photography with Just One Light by Tilo Gockel. View the full book here.