From The Art, Science, and Craft of Great Landscape Photography
By Glenn Randall
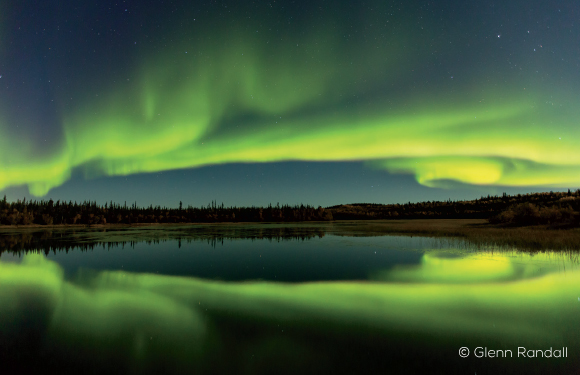
Words cannot truly convey the awesome experience of watching the aurora swirl across the sky. The aurora can be seen most frequently in the auroral zones, doughnut-shaped regions centered on the magnetic poles, so unfortunately for photographers based in between the southern and northern auroral zones, it’s mainly an experience reserved for those willing to travel. Both the southern and northern auroral zones offer an excellent chance to see the aurora, but the northern zone is far more accessible to photographers in North America. Two recommended destinations with relatively easy logistics are Yellowknife, in Canada’s Northwest Territories, and Fairbanks, Alaska. Iceland is another popular aurora destination, but the weather is notoriously bad.
To see the aurora most vividly, the sky must be dark, which precludes arctic destinations in the summer months. Auroral activity tends to peak around the fall and spring equinoxes, which means late September and late March are good times for a trip. The most vivid displays often erupt in the hours around midnight, but they can occur at any time of night.
In Canada and Alaska the aurora most commonly appears in an arc of sky from northwest to southeast (moving clockwise around the compass). The ideal shooting location allows you to photograph in any direction within that 180-degree arc.
© Glenn Randall
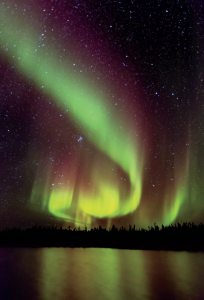
Unlike the Milky Way, which moves slowly, the aurora is in constant motion. Use the shortest shutter speed you can, consistent with good overall exposure, to keep the fine structure in the aurora from becoming smeared in your image. With an aurora of average brightness, a good starting-point exposure is about 10 seconds, f/2.8, ISO 3200. Check your histogram to be sure you are capturing adequate detail without blowing out the highlights (which is surprisingly easy to do). Engage the blinking highlight warning to double-check that you aren’t clipping the highlights. Turn your LCD brightness to its lowest setting to avoid getting a false impression about how much detail you’ve actually recorded. As always, your histogram is your best guide to correct exposure, not the image on your LCD.
© Glenn Randall
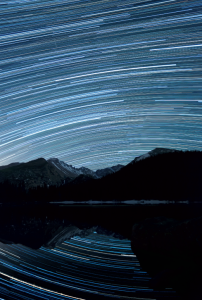
The aurora’s constant motion means you’ll need to compose each shot separately while looking through the lens. You can’t just point the camera in the general direction of the aurora and leave it set to that position. In order to see through the lens, your eyes must be as dark-adapted as possible, which means you should use a headlamp with red LEDs just as you should when shooting the Milky Way. Be sure to turn it off before making the exposure. At high ISOs, the light of even the dimmest headlamp will turn your foreground bright red. Be sure to remove any filters from your lens. Filter coatings can generate interference patterns in your image that are difficult or impossible to remove.
You’ll want to focus carefully at infinity using the procedure I described for shooting the Milky Way. Once you’ve achieved critical focus, shoot a test frame, check that it’s sharp, then tape the focus ring on the lens to prevent accidentally changing the focus. Then double-check the focus with another test frame. While you’ve got the tape out, put a couple of squares over the LED that lights up when your camera is writing data to the card. You should also tape the “active” light on your intervalometer, if yours is so equipped. When you’re fully dark-adapted, those lights are an annoyance. I’ve even seen the intervalometer’s blinking “active” light cast a perceptible red tint over the foreground.
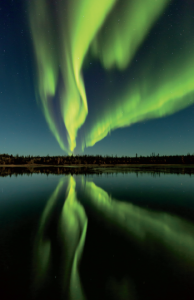
© Glenn Randall
When the aurora is good, it’s big (in an angular sense). I used my Canon 16-35mm f/2.8 lens exclusively when shooting the aurora during a recent trip to Yellowknife. I made about two-thirds of my aurora photos at 16mm.
Modern cameras are so sensitive at high ISOs that they can actually give you a fairly accurate meter reading from a bright aurora. I typically use manual exposure mode, but bias the exposure toward the plus side by one stop or occasionally more. For my Canon 5D Mark III, I discovered that the light of the full moon shining directly into the eyepiece, or even bouncing off my cheek and into the eyepiece, could alter the exposure. For that reason, I always set the exposure in manual mode while looking through the camera, and used my black-gloved hand to prevent stray moonlight from entering the eyepiece while metering.
One final tip: in cold weather, avoid breathing on either the viewfinder or the front element of your lens, and check both frequently for frost or condensation.
Learn more from seasoned landscape photographer, Glenn Randall by reading his complete book, The Art, Science, and Craft of Great Landscape Photography.