
You can make a big impression with small flashes. In his book Creative Flash Photography, Tilo Gockel uses the following workshop to explain how to create a gobo projection using flash.
What is a Gobo Projector?
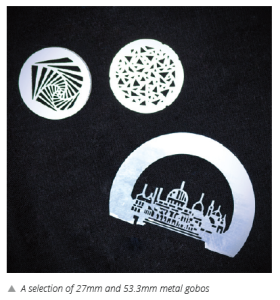
A gobo projector works like a slide projector, but instead of projecting a photographic slide it uses a material that is similar to a stencil, usually made of metal or etched glass, to project a pattern. This gives the projection higher contrast, and the material is more heat resistant than a slide. Gobo projectors are usually much simpler than slide projectors because they don’t require complex mechanisms to change slides between shots. They typically use a halogen light source, but in this workshop we use flash to project interesting backgrounds in the studio.
In the context of theater and event management, the term gobo is used to describe patterned slides, but in a photo studio it describes a shade that is placed in front of a flash to selectively block the light it produces. In both cases, the gobo is placed between the light source and the scene, which can be a projector lens or a photographic subject.
The Setup
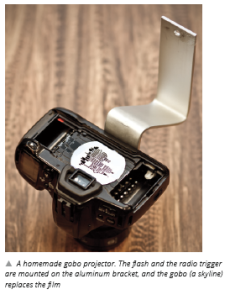
 There are various ways you can use flash to project patterns. The simplest (and most expensive) approach is to equip a studio flash head with a custom gobo projector, such as from Walimex or Richter. You could also hack a gobo projector and replace the halogen light source with a speedlight, which is less expensive. Another simple and cheap method is to use an old analog single-lens reflex (SLR) camera body with a lens attached. As shown in the figure on the right, the gobo replaces the film in the modified SLR, and the flash is mounted where the back of the camera used to be, with a custom bracket that also serves as a tripod mount. You can cut the gobo to fit if it is too large, or you can mount it on aluminum foil or a piece of card stock if it is too small. I used wire cutters to remove the shutter from the SLR, and I used tape to fix the gobo in place.
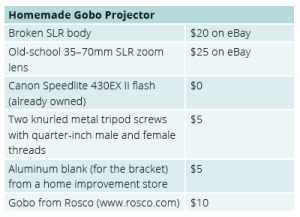
You can mount the aluminum bracket in a vice while you bend it to shape and drill the mounting hole. I mounted my projector on a Manfrotto MA026 umbrella adapter so I can use it in portrait or landscape orientation. The parts I used are listed in the accompanying table.
Camera Settings and Shooting
Because this setup uses the light path of the SLR as a projector and the gobo is located on the film plane, the projected image is guaranteed to be sharp, and it can be zoomed and focused with the focus scale on the lens, just like when you take a photo. The aperture can be adjusted, too, although you will probably leave it at the widest setting.
To optimize the light yield, set your flash to 1/2 or full output. Set the reflector to its wide-angle setting and position it as close to the gobo as possible. If you are using a gobo that is a slide or is made of plastic or an additional colored gel, make sure the flash won’t melt it. It’s best to mount gels between the gobo and the camera, or cover the projector lens with the gel. In this setup, the flash is connected to an RF-602 radio trigger, although a cable or slave cell should work just as well. If your flash unit has a modeling flash function, you can use it to assist zooming and focus. Modeling flash emits a series of weak flashes that appear as continuous light to the human eye. The Canon Speedlite 430EX II we used allows you to assign modeling flash to the Pilot/Test button.
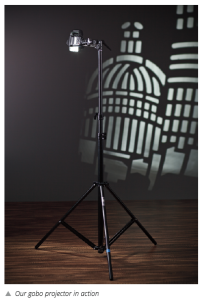
This type of gobo projector is effective, but not very powerful, so you may need to dim the studio flashes a bit and increase the ISO. The accompanying illustrations show a possible setup and the results. Gobos come in a wide range of prices, so compare before you buy.

Post-Processing in Photoshop
I didn’t have to change much in the final image; I did only the usual straightening, cropping, color and contrast adjustments, and sharpening in Photoshop, but you could perform all these same steps in Elements, Lightroom, or Adobe Camera Raw.
Tips, Tricks, and Notes
If this workshop whets your appetite, do an Internet search for “DIY gobo projector” or “homemade gobo projector.” The Internet is a great source of inspiration for all sorts of homemade projects.
Want to Learn More? Check out Creative Flash Photography by Tilo Gockel.