Always on, always at hand, and inconspicuously deployed, today’s smartphones empower us to record the world in ever newer and more personal ways. By leveraging the photo-editing applications found on the iPhone, professional and amateur photographers alike are able to create not only editorial imagery, but also creative art.
The Art of iPhone Photography explores examples of how iPhonegraphers conceive, compose, and create works of photographic art with apps for the iPhone. Through the tutorials in this book, readers will gain an understanding of the artists’ visions, creative decisions, and techniques. Beginning and advanced iPhoneographers alike will immediately be able to apply what they learn and take their own photographic art to the next level.
Learn from this tutorial titled, “Expressing Abstract Concepts in a Surreal Way” by Edina Herold
In this tutorial you will learn how to add an element from one picture to another, as if the new element had always belonged to the background image. You will also learn how to use blur to remove unwanted parts of the background and how to enhance the overall look and feel of an image by adding a vignette and some texture.
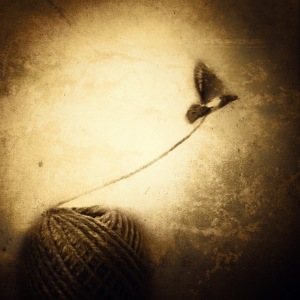
I usually like to express abstract things in a surrealistic way. In this image I explored the contradictions between freedom and constraint. To express this conflict I used the metaphors of a flying bird and a ball of yarn. Freedom and constraint mutually define each other. Freedom is borne of constraint, but the length of the rope determines the degree of freedom.
What You’ll Need: Juxtaposer, Photogene, BlurFX, Picfx
The Process
Step 1: Transferring an Element of an Image to Another Picture
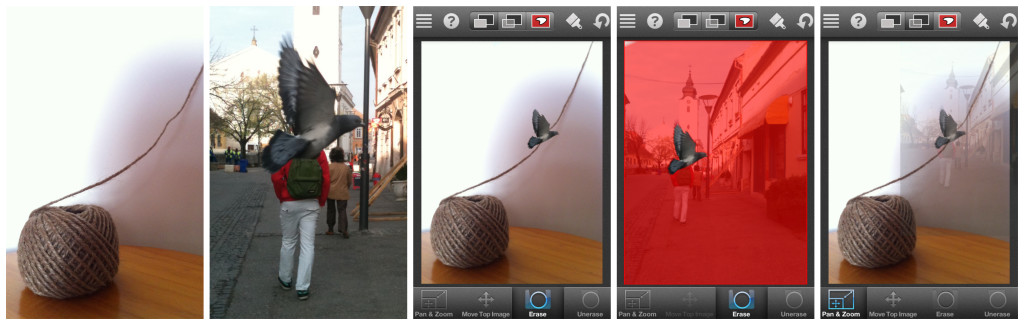
There are multiple applications for blending images, but my favorite is Juxtaposer because its intuitive tools allow great precision. First I loaded the base image | 1 | and the top image | 2 | from the camera roll. I touched the Pan & Zoom function to align the images precisely according to my concept | 3 |. After I positioned the elements where I wanted them, I used the Red Mask option from the upper menu bar to accurately isolate the bird from the top image | 4 |. I fine-tuned the image with pixel-level accuracy using the Erase and Unerase functions, and then I saved the resulting image | 5 | to the camera roll for further processing.
(Images 1-5)
Step 2: Cropping the Image to a Square Format
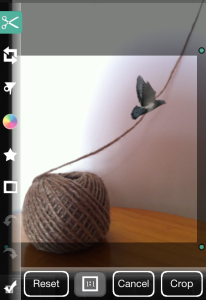
I love square format images because a square is a very stable shape and it gives me different composition options. I decided to crop the picture before processing it any further. I like to use Photogene for cropping, so I opened the image in this app, selected the Scissors icon, then chose the 1:1 icon, which represents a square ratio | 6 |. I pressed Crop and saved the square format image to the camera roll.
Step 3: Blurring Unwanted Background Elements
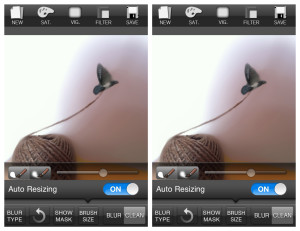
I now had a square format image with the base elements of the picture, but there were a lot of distracting elements that I decided to soften and remove by applying blur. The blurring process usually produces a soft surface, which serves as an excellent foundation for textures later. I imported the image into BlurFX, which offers several types of blur: Motion, Gaussian, and Median | 7 |. I selected Median blur. The Brush size can be adjusted | 8 | for precise work. BlurFX has a red masking option, similar to Juxtaposer, which can be activated by touching the Show Mask icon. I was able to work with pixel accuracy by alternating between the Blur and Clean buttons.
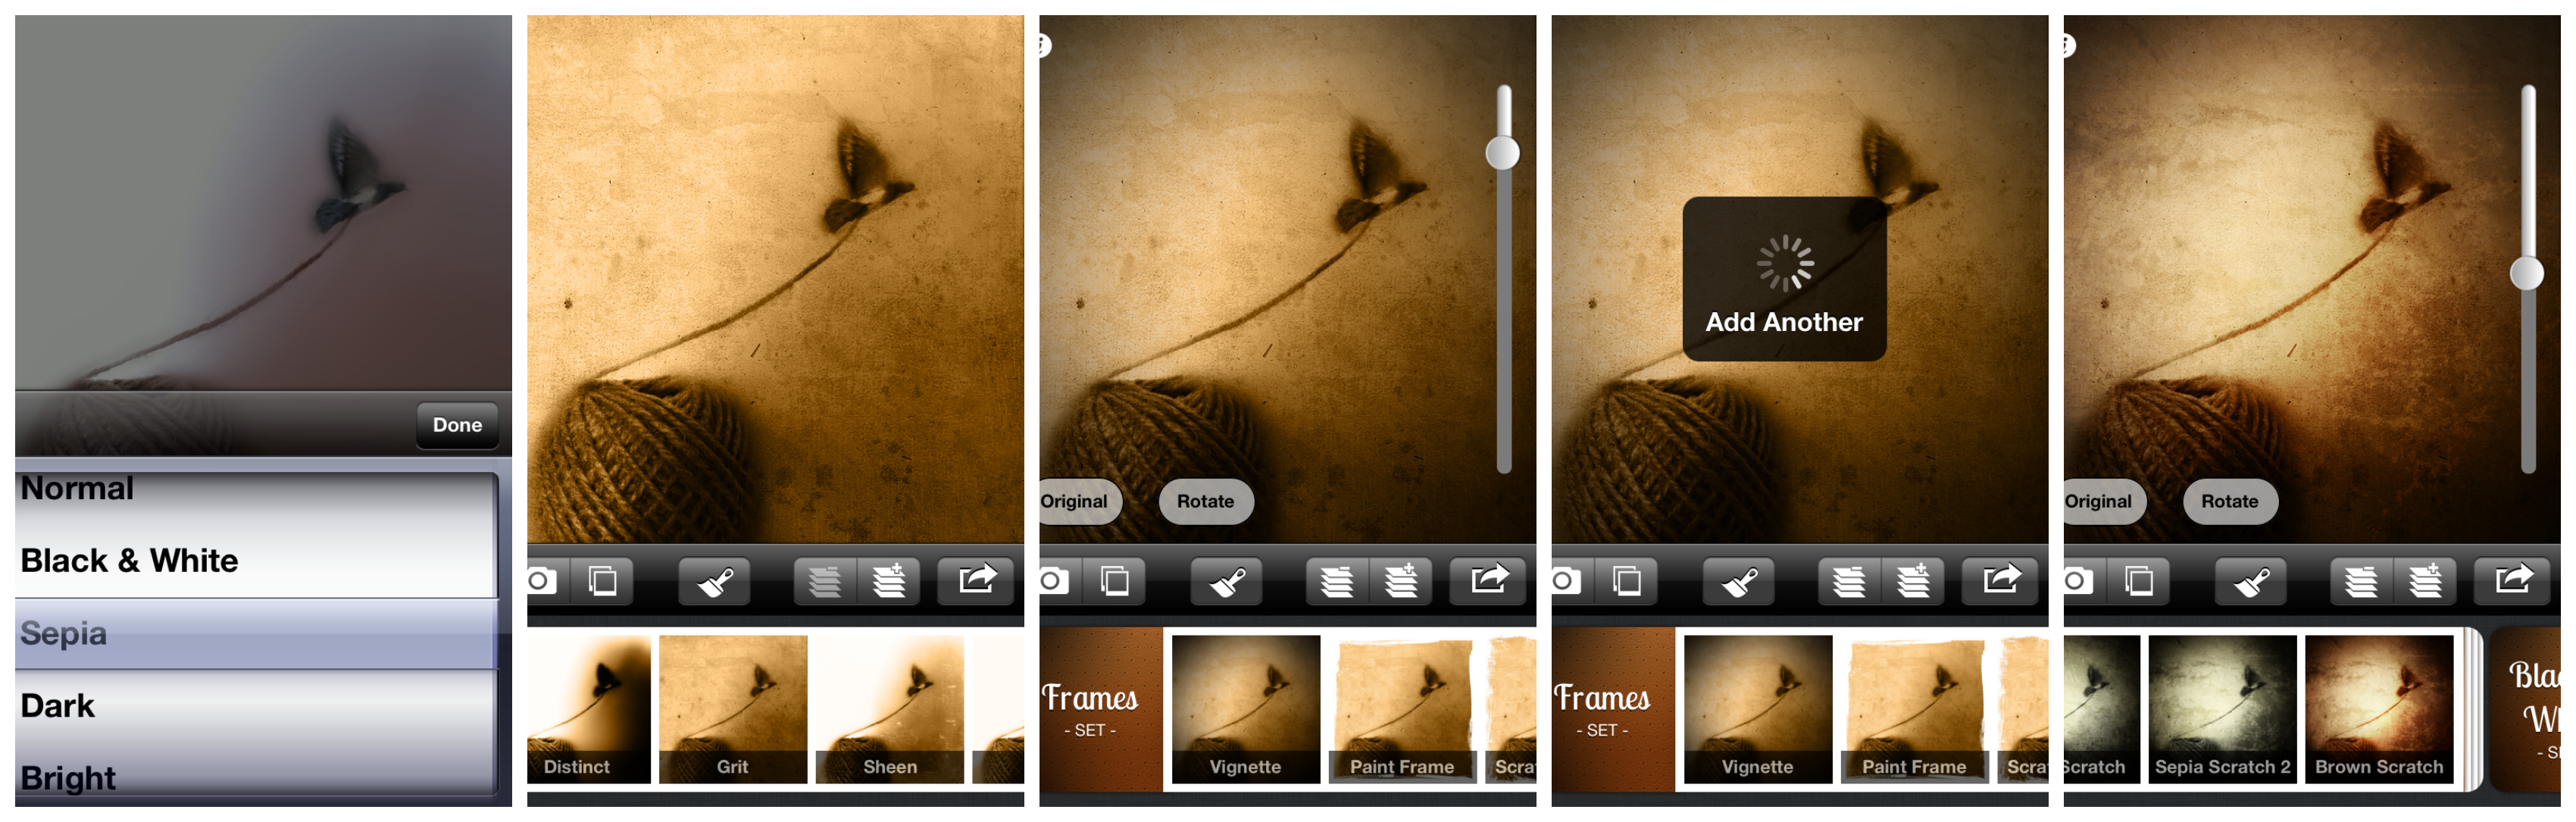
Step 4: Modifying Colors and Adding Textures and a Vignette
Picfx is my favorite app for adding textures to images. After I loaded the blurred image, I decided to add a tarnished-looking color by hitting the Brush icon and selecting Sepia | 9 |. After this I applied the Grit filter from the Classic set | 10 |. The slider at the right edge of the screen allowed me to adjust the strength of the filter. Because I wanted to add more filters without reloading the image several times, I pressed the icon with the + symbol, which allowed me to add another option | 11 |. I chose Vignette from the Frames set | 12 | then Brown Scratch from the Premixed set | 13 |. I then touched the Send button to save the final image to the camera roll. Because of the complexity of the abstract concept and the surreal look of the image, I decided to give the piece a simple title: Free.

My Favorite App: Picfx and the Final Image
Picfx is my favorite app to add texture to an image. More effects are available with each software update. In addition to textures, it has intuitive opacity controls so you can make subtle adjustments to the intensity of an effect. The interface is well organized so you can easily choose from the grouped effects. The filtering option for different color modes is an additional feature that helps you achieve your editing goals. Picfx allows multiple texture layers that result in endless combinations, which give your images a unique look and feel.
Summary
To realize my abstract content objectives, I used Juxtaposer to add an element of the first image to the second image, Photogene to crop the image to a square format, BlurFX to blur the background, and Picfx to modify the colors and add some gorgeous textures with a vignette.
From the book, “The Art of iPhone Photography” by Bob Weil and Nicki Fitz-Gerald.
Follow Rockynook on Twitter and Facebook for more articles, updates and exclusive online deals!